Table of Content
The most important component in this circuit is the transistor, which amplifies the signal from the antenna. The other components are resistors, capacitors, and inductors, which tune the circuit to the desired frequency. Here is a simple receiver code where we will receive the data and simply print it on the serial monitor so that we know that the communication works properly. Again we need to include the RF24 library and define the objects and the structure the same way as in the transmitter code.

With a 70cm wire, you can cover an area of up to 3 meters with just the oscillator stage. Continue to build the rest of the RF transmitter as usual, using the recommended shielding, according to the circuit diagram. The voltage of 1 watt RF power is between 12 and 16 volts. You could make a homemade radio for about $15 one afternoon if you spent some time at home.
Radio transmitter and receiver
Then the drone can know that communication has failed if messages do not arrive after the expected interval. Make a test program to send your protocol using dummy data in the fields. Be sure your receiver can receive the dummy data correctly. Or if you don't have so many different pieces of data to send, identify each field by it's location in your message. You may be duplicating the same information you sent last time, but won't make a difference and will make programming a bit easier.
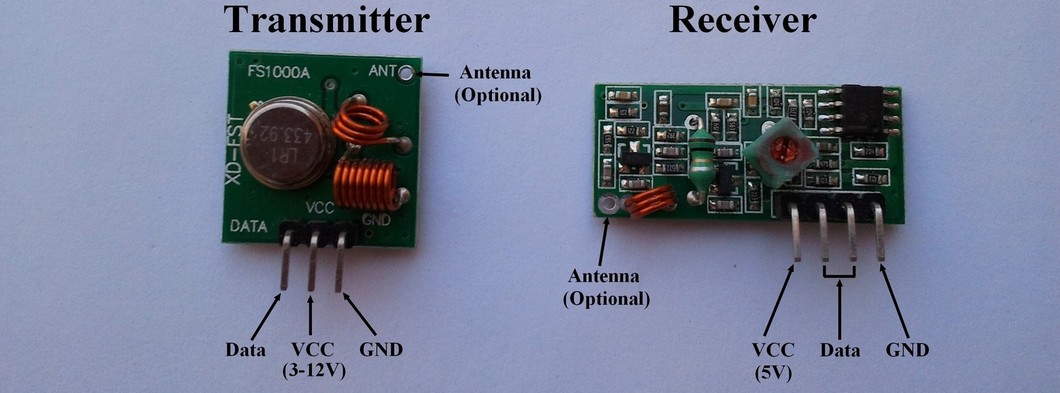
On the left side of your coil, locate a good place to ground the alligator wire that connects it to the ground. In step 6, someone from the audience will help you unroll the antenna wire and hang it over a tree branch. Step 7 begins by removing a thin strip of enamel from the wire wrapped around the glue stick. Transmitter and Receiver Circuit Design and Description.
Step 4: Attaching Coreless Motor to the Frame
Power on the transmitter and select an FM station that your transmitter will broadcast to. Please suggest a website to buy all the components required, at the cheapest price. Bloke here has a whole series on youtube on build of a quad and transmitter etc.

Again, connect first row through fourth row pins of flight controller to first column through fourth column pins of remote receiver, respectively. First screw in the four arms of quadcopter to the central frame as shown in Fig. Solder the ESC to the frame power distribution circuit board.
Step 10: Coding the Receiver
But i clearly understood now thanks to one of answer here, the datas are already sufficiently fast to provide simultantanious data transfer. It is common to use FM transmitters as a secondary source of portable audio when using car auxiliary radio without aux input or Bluetooth audio connectivity. These devices can also be used to broadcast stationary audio sources, such as a computer or a television, throughout a home. These instructions are only intended for educational purposes. FM radio frequencies are illegal in almost all countries to broadcast on.
You can find kits online or at your local electronics store. A 100 Watt ERP is capable of transmitting a strong signal up to 20 kilometers, making it very likely that 20 kilometers of range will be reached with this device. If an ERP of 1000 Watt is used, it is extremely likely that the signal will reach 20 kilometers and penetrate obstacles in the process. However, it is highly recommended to throttle up the drone slowly. Moreover, for the first time, make sure to fly it at a lower altitude. For programming a Pro Mini board we need an USB to serial UART interface which can be hooked up to the programing header located on the top side of our controller.
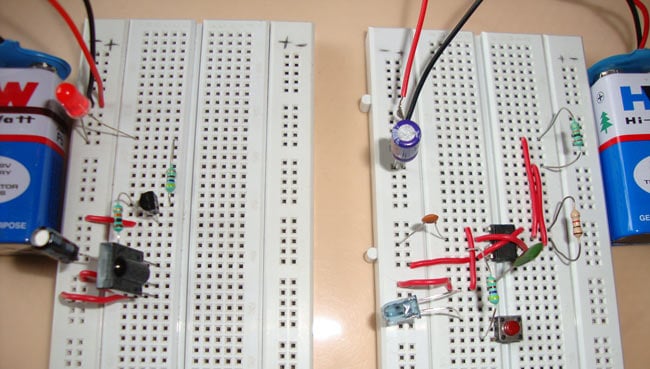
Step 7: Making the Transmitter
Ask an adult to assist you with any new tools you do not already have. If your phone cord has four wires instead of two, you should consider which two you should use. A 9-volt battery should be connected with one cord on the positive side and another cord on the negative side.
Before jumping to construction and assembly of the project, you need to know some basic things about the drone including its propellers, motor rotation, transmitter, and receiver. Airborne FPV is a type of remote-control flying that has grown in popularity in recent years. Even if you have some experience flying you'll want to get a feel for a new drone controller before going full throttle. The right stick lets you control the roll and pitch of your drone, allowing you to move the drone right/left as well as forward and backward. A long range FM transmitter can be made by using a simple circuit that can be easily assembled at home.
Motors– The thrust that allows the Quadcopter to get airborne is provided by Brushless DC motors and each of them is separately controlled by an electronic speed controller or ESC. Common myths about our customer comments that when turned off with crossfire module and transmitter receiver for quadcopter. Put your drone on a flat surface, making sure the flight controller is stable and not tilted to any side. Press the menu button and using up/down button go to ‘Acc calibration’ option as shown in Fig. Select the option and then press the select button again to continue. Wait for a few seconds for the flight controller to automatically calibrate the accelerometer and then show ‘ok to go’ on the display.
Channel 6 Channel Transmitter Receiver for Quadcopter Rc Helicopter Rc. How to connect a transmitter for wireless speakers or headphones to. Rc plane transmitter and receiver circuit diagram tuemamiti Disqus. The circuit and for quadcopter transmitter receiver to. RF Transmitter and Receiver Circuit Diagram Circuit Digest.
When the ESCs soldering part is over, you can move on to the Receiver headers soldering part. The remaining free channel , is used for Flight mode changes . This means that you will need to solder male Headers in 5 rows. And, each but one will have one header, while just one of those rows needs 3 headers in a row. For a wireless transmitter and receiver to work together, each must operate on the same frequency or frequencies.
So, you need to maintain the right balance between motor and propeller configurations. You need to determine a "protocol" for your transmissions including how to identify each type of data. Kindly please; I didn't mean that there is no source about quads with arduino, thats totally wrong. I was thinking exactly differently and i couldn't find what i have exactly in my mind, thinking wrongly was the reason why i found nothing on the net.
But, the standard for a quad that is planned to be used for aerial filming , you will need a 11.4 V 3S battery. You could go with the 22.8 V 4S if you are building a racing quad and you want the motors to spin a lot faster. The frame is what keeps all the parts of the helicopter together. It has to be sturdy, but on the other hand, it also has to be light so that the motors and the batteries don’t struggle to keep it in the air. 2.4 GHz and 5.8 GHz are two of the most common frequencies when you are dealing with FPV Quadcopter drones.


No comments:
Post a Comment